How we brought our Java production environment right into the developer’s machine
Author: Shamsul Arefin
Lead Architect
Software Architecture / Java / .NET / Machine Learning
As a services company with multiple competencies, we live in a heterogeneous environment. With competencies spread across the team, individuals are not bound and restricted to any particular technology or competency. The same person who is working with Java UIMA plugin for text analytics today is shifting their role as a data scientist and playing with Python and Sickit-learn another day. Being a services company we do not impose the choice of any specific OS platform/IDE to the individual. I started to count the number of IDEs our developers use, but then I stopped when they easily reached a two digit figure – with Eclipse, NetBeans, IntelliJ IDEA, PyCharm, Visual Studio, XCode, Xamarin Studio, Android Studio, Visual Studio for MAC, and Jupyter Notebook being the most common.
However, to ensure a smooth development experience and to figure out the environment specific issues detected early on the development cycle, we somehow needed to align our development environment on a project basis. And yes, some of you have already guessed it correctly – the solution was to dockerize our development environment. Let’s look at an example.
We started with a simple project that includes a web app (SPA) and a Java based Web API built with Dropwizard that has already been configured to work with Maven. The Dockerfile for the web app was relatively straightforward.
FROM nginx:1.11.10
COPY app.conf /etc/nginx/conf.d/default.conf
EXPOSE 80
Here we have used Nginx official Docker image as our Base Image. We then replace the Nginx default configuration with our specific configuration. Note that we didn’t yet copy the content (source) of the web app to the root of the Nginx Docker. Instead of copying the source code directly into the Docker, we will mount the source code as a volume to avoid rebuilding the image every time we make any code changes. We then tell the Docker image to expose the port 80, which is the default listening port for an Nginx server.
For the Java Web API, we have used the official Java Docker image with OpenJDK version 8 as the Base image, and then installed a specific Maven version into the Docker image. Alternatively we could have used the Maven official Docker image as our base image. We just wanted to make sure to use the specific JDK version by inheriting the image from Java and not from Maven.
FROM java:openjdk-8-jdk
ENV MAVEN_VERSION 3.3.9
RUN mkdir -p /usr/share/maven && curl -fsSL \ http://apache.osuosl.org/maven/maven-3/$MAVEN_VERSION/binaries/apache-maven-$MAVEN_VERSION-bin.tar.gz | tar -xzC /usr/share/maven --strip-components=1 \
&& ln -s /usr/share/maven/bin/mvn /usr/bin/mvn
ENV MAVEN_HOME /usr/share/maven
Now, while copying the source code to the Docker image, I was really tempted to do the following.
COPY src /code/src
COPY pom.xml /code/pom.xml
COPY configuration.yml /code/configuration.yml
RUN ["mvn", "package"]
However, I quickly realized that this can possibly end up frustrating the developers. On every code change and build, we will now have to wait for a long time for the Maven repository to get initialized and download the whole world in the process :)
We looked around for a solution to take advantage of the Docker FS layer caching mechanism. And this was to copy the POM file before the actual source code.
WORKDIR /code
COPY pom.xml /code/pom.xml
RUN ["mvn", "dependency:resolve"]
RUN ["mvn", "verify"]
COPY src /code/src
COPY configuration.yml /code/configuration.yml
RUN ["mvn", "package"]
We first copy only the POM file at line 2, and then the actual source code is copied at line 5. The lines 3 and 4 make sure all dependencies are downloaded to the local repository, and run any checks to verify the packages. This means the local Maven repository will be cached into the Docker image until we change the pom file, which is not that frequent.
The final Dockerfile looks like the following.
FROM java:openjdk-8-jdk
ENV MAVEN_VERSION 3.3.9
RUN mkdir -p /usr/share/maven \
 && curl -fsSL http://apache.osuosl.org/maven/maven-3/$MAVEN_VERSION/binaries/apache-maven-$MAVEN_VERSION-bin.tar.gz \
 | tar -xzC /usr/share/maven --strip-components=1 \
 && ln -s /usr/share/maven/bin/mvn /usr/bin/mvn
ENV MAVEN_HOME /usr/share/maven
WORKDIR /code
COPY pom.xml /code/pom.xml
RUN ["mvn", "dependency:resolve"]
RUN ["mvn", "verify"]
COPY src /code/src
COPY configuration.yml /code/configuration.yml
RUN ["mvn", "package"]
EXPOSE 8050
EXPOSE 6006
ENTRYPOINT java -agentlib:jdwp=transport=dt_socket,server=y,address=6006,suspend=n -jar $(ls target/dv1-server*SNAPSHOT.jar) server configuration.yml
Notice that we have exposed a couple of ports by the Dockerfile EXPOSE keyword. The actual Web API is exposed at port 8050, and port 6006 is used for remote debugging. Also note that we are using the ENTRYPOINT command which allows us to configure a container that will run as an executable. This command will be executed when the container gets started. We are running the Jar file with an optional argument to enable remote debugging from outside the container, using the Java Debug Wire Protocol (JDWP).
Now that both of the Dockerfiles are ready, we need to build them to create Docker images and run the container with parameters like port mapping, image name, volume and other optional parameters, for example, the memory limit. We also need to pass the information to the web app container image that it has a dependency on the Web API server image. This is the place where Docker-Compose comes handy. Docker-Compose is the tool for defining and running multi-container Docker applications. We can use a Compose file to configure the application’s services. By using a single command we can create and start all the services using that configuration.

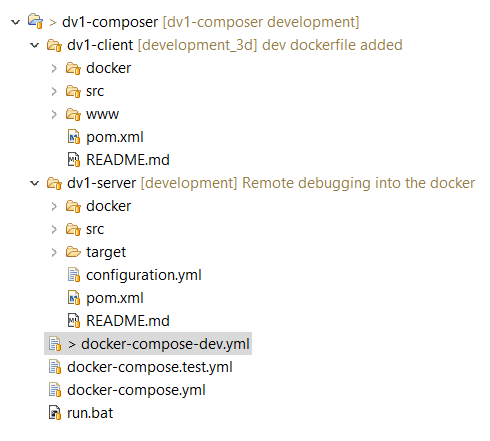
Please note that in the above Docker Compose file, the Dockerfiles for individual services should be within its context. In our case, the web app and the Web API are two different Git repositories/projects. To bring them together, we created a third repository named Composer and added those dependent repositories as Git submodules, as illustrated in the following image.
As mentioned earlier, we have mounted the source of the web app project into the root of Nginx as a volume by using the Docker Compose file. We have also specified the memory limits of the container, so that the application is built in an environment that is identical to the production environment, right from the development phase. With all these in place we get the production-like environment ready right on the developer’s machine by using the following single line of command:
docker-compose -f docker-compose-dev.yml up --build
There you have it. Our dockerized development environment.